Time

It’s a food blog. It’s my food; personal to my family table, in the moment, forever changing due to a duo of professional careers, a teenage appetite, a two year old pallet, and the four year old…well…he changes everything (look up Prader-Willi Syndrome here: http://www.fpwr.org).

In our home we follow moments much more than time. Time to us is a series of deadlines, everything in between are moments we move about, making choices, moving to the next deadline. Out the door, 6:20am, walk into work 7:00am, hit my appointment marks, pick up kid by 3:45pm, Occupational therapy starts at 4pm, Physical therapy 5pm, kids dinner round 1  at the table, then bathe, read to them and 7:00pm kids in bed. … 7:05pm…put two year old back in bed. 7:10…wait to see if two year old gets up again. 7:20 … dinner round 2. I look at my wife, pour wine for her, whiskey for me. I finish cooking and we reflect. Deadlines were met. That’s a typical Tuesday.

It’s the in between I cherish. Hitting the deadlines alone seems like an accomplishment enough but they don’t really count. I can move fast enough at work to beat everyone but it doesn’t mean that passion and quality will show in my work. I can be maticulous and produce a beautiful result but if the “time” passes no one needs you anymore or they are disappointed to the point your work is irrelevant. Time is a fantastic beast that will protect your every move but only with one hand squeezed tightly around your neck. You can’t move too fast, not too slow, just keep moving. This is a food blog…right, regroup.

Cooking was the balance I was looking for in life. I was a rock star at work, I was failing at home as a dad (too much, too little). Quality on both ends was hindered. I couldn’t center myself. After crying in a grocery store parking lot I found myself sitting on the floor watching chicken dry out in the oven and I was so damn excited about it! I watched these flakes melt into milk and form mashed potatoes instantly before my eyes! I watched my (then) 2 year old (now 13) devour this meal as if it were the first time he ever tasted “real” food. That happiness and peace is a moment between deadlines that is captured, realized, reflected upon and allowed choices to be made that would either keep me on the right path or change everything for the better. 

This is just a food blog where I try and capture moments between time in hopes you catch a glimpse of the happiness I experience everyday. … not just in food, but how the food I cook interprets my life and the lives around me.

Food is Hope.Share your Food.©

-t

Lemon & Garlic Baked Chicken Breast with Spinach-Artichoke Spread

Cook this. It’s awesome!

IMG_6721.JPG

For Chicken:
2 chicken breasts
1 large lemon (2 if small), sliced 
Zest from lemon(s)
2-3T italian seasoning
2tsp garlic powder
4T balsamic vinegar
1/2C Spinach-Artichoke Spread (recipe follows)
Salt and pepper

Place chicken in a bag with balsamic vinegar for 30min up to 2 hours. Lay 3-4 lemon slices in a glass baking dish. Removed chicken from bag, place on top of lemon slices, salt and pepper all chicken. Next liberally season chicken with garlic powder and italian seasoning. Top each piece of chicken with lemon zest and garlic. Drizzle 1/4C balsamic vinegar over chicken. Squeeze any remaining lemons into pan. Cover with foil and place in oven for 20 minutes at 350. Remove from oven. Take off foul and return to oven until cooked through (about another 10-12 minutes).

Plate chicken and serve with warm roasted artichoke-spinach spread on top.

For Spinach-Artichoke Spread:
1/2C Fat Free Sour Cream
1/4 tsp fresh ground pepper
3 cloves garlic
1 – 14oz can artichokes
1 -10oz frozen spinach
1 – 8oz block of 1/3 less fat cream cheese
1 – 8oz block fat free cream cheese
6oz part skim mozzarella (1.5 cups) .5 cups to be used for top of dish
1/4 parmesan, grated

Place all in food processor except 1/2C of Mozza and 2T parm. 
Bled well until combined but course
Place in an 8×8 dish (any 1.5 quart dish)
Top with remaining cheeses
Bake at 350 for 30 minutes

Pork Loin Tacos with Warm Poblano-Corn Relish

Cumin and Chipotle Pork Loin Taco with Poblano-Corn Relish

Cumin and Chipotle Pork Loin Taco with Poblano-Corn Relish

Pork has got to be the number one under utilized meat used to go inside a taco in the United States, at least amongst home cooks and family meals. Over the past few years food trucks, cross-over tacos and popular “fast-casual” eateries have brought traditional Mexican Pork Carnitas and untraditional (Korean, Vietnamese, Thai) pork tacos to the masses; but in the home, boxed taco kits and ground beef still rein supreme (admittedly still a childhood nostalgic favorite in our house). This recipe gives us a very healthy alternative and only takes a few more minutes to cook then its boxed taco cousin. Save yourself more time by cubing the pork and marinating it overnight in the seasoning! Enjoy!

1 package of your favorite taco size soft tortillas.

Poblano-Corn Relish
1C frozen corn
1 poblano, top removed and dig the core out
1/2 jalapeno,top cut off and dig the core out
1/2C red onion, fine dice
1 or 2 cloves garlic, minced (about 1-1.5 tsp)
1 chipotle chili from can, stemmed seeded and chopped very fine (only use half for less heat)
1/2 tsp smoked paprika
Juice from one lime
1/2 tsp rice vinegar
Salt and pepper to taste

Preheat broiler to highest temp. Set the rack so the fatest pepper will be 4-6 inches from heat source.

Prepare relish:
Combine all relish ingredients except corn ,poblano and jalapeno. Place chilies on cookie sheet and place under the broiler. leave the door partially open and WATCH THEM! As the peppers begin to blister and char turn them so they char evenly. Once mostly charred on all sides remove from oven. Let cool 2 minutes. Now chop the chilies and add to the other relish ingredients, cover with plastic wrap. Heat a skillet on high heat, no oil. When pan is hot, add frozen corn and stir with a wooden spoon. When corn starts to show brownish/black char spots remove from pan into the relish ingredients. Replace plastic wrap and let sit ten minutes. Warm chilies and corn will start to meld with the other ingredients and get seriously happy!

Pork
1 – 2lb Pork Loin, trimmed of fat, cubed
1T Adobo sauce from chipotle can
1/2T Chili Powder
1T Cumin
1tsp paprika
1tsp garlic powder
1tsp onion powder
1tsp oregano
1tsp salt
2T canola or other neutral oil
2T lime juice

Combine all ingredients except pork in a small bowl. Mix. It will become paste like.
Place cubed pork loin in a one gallon zip-lock bag and then add seasoning-paste to bag. Work the bag with your hands to incorporate the mix all around. Let rest for at least 15 minutes. If you have longer, one hour or overnight is better marinating time.

Place about 1-2 tsp of oil in a medium hot skillet. Add pork and stir fry until cooked through. Check for doneness when pork firms up (about 7-10ish minutes).

Place about 2 tablespoons of pork and as much/little relish as you’d like into a tortilla. A dollop of light sour cream doesn’t hurt. Enjoy!

Basil Roasted Chicken Stuffed with Spinach , Asiago Cheese and Sun Dried Tomatoes

Take Charge! Be Confident!

Be Confident!

Mmmmm....

Mmmmm….

Confidence is celebrating knowledge one has gained through life experience and education; utilizing it to empower themselves only in a way that gives the individual the strength, leadership, and ability to pass on such education to others so they build a belief system within themselves to drive their own individual passions. Confidence allows for an empowered world to be run by those who celebrate individuality while collectively working toward a greater future. Anything else is simply a weak, wavering stack of transparent self inflation with little support waiting to crumble at any point. There are those who see themselves as bigger than those who surround them; a group of folks who have to wear a mask of power to hide the lack of confidence to be their true selves. This group gives confidence its bad name, leading those to see confidence as a cocky, pretentious, inflated sense of self worth. I have stood on a platform of insecurity, I have broken and fallen through that platform when the weight of my insecurities became too heavy. I could not climb out until I knew I had the strength to climb out. I knew that even if I fall, fail or get hurt it does not mean “I can’t…”. So what does this have to do with chicken? Let me explain…

Cooking helped me gain confidence in my abilities to be creative, follow through with a task and be proud of the product I completed. I wasn’t a good cook when I started. I would go to the library and check out cookbooks that I knew (Childs, Pepin, Puck, Joy of Cooking), chef names I recognized (mainly form TV), books on my Grandmother’s counter and pretty book covers (ya…I said it). Along with the books, I would call my Grandmother and she would walk me through cooking a dish. She walked me through Apple Pie, Salmon Patties, and cooking a Fried Egg. She would say “so how’s it goin?'”, and as I wave the smoke out of my face I would kindly reply, “great!”. My mother did the same, walking me through mac and cheese (box stuff), pan fried hamburgers, fried chicken and cooking spaghetti noodles. I ate so much burned, dry, salty, no salt, raw food…but I was so proud. I got better each time. I learned you can’t always cook on HI heat, salt is always necessary, just because fried chicken is golden brown doesn’t mean it’s cooked through, brownies shouldn’t cook for 4 hours while you nap (ooops…buy a timer), all steak is not equal, gnocchi is thy enemy, pickles are the devil, grills burn stuff, my butternut squash soup recipe should never go in a sourdough bread bowl, and when cooking for your girlfriend don’t throw scalding hot grease on her while showing off, flipping sauteed green beans and trying to channel your inner iron chef (luckily she later agreed to marry me). Did I say something about chicken? oh ya…

So I got to a point in my cooking where I gained the confidence to try stuffing a chicken breast. I remember only having two chicken breasts. If something went arry during the splitting process then it was going to turn into chicken nugget night. I slipped the tip of the knife into one end of the chicken breast, gently began gliding around the breast and slowly halted on the other side. I lifted the pocket and behold! I made a big enough area to insert….stuff! I felt like Mori-frickin-moto slicing through the next breast. I had failed at so many dishes before this recipe. I only had a few books and an early Google to walk me through the slicing process. I could have completely screwed up another meal and my wife and I would have settled for (not less) but not what I had planned….and that’s okay. I believed, I tried, I succeeded. The entire meal came together and my wife was impressed. I think I cooked a stuffed chicken breast every week for months until my wife told me to calm down. Once you practice and get the hang of making a little pocket on the side of a chicken breast your options are wide open on what you can stuff inside. Here is a favorite, easy and impressive recipe for any time of year.


OH! and at only 350(ish) calories per chicken breast and having your favorite light salad on the side makes this a surprising healthy meal!


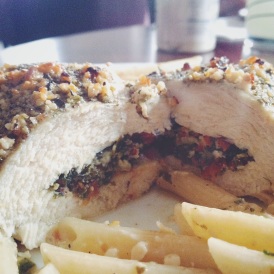
Basil Roasted Chicken Breast
Stuffed with Spinach, Sundried Tomatoes, Garlic and Asiago Cheese

4- 4oz Chicken Breasts, split down the side to make room for good stuffing! (splitting chicken video instructions)
1tsp dry Italian Seasoning
2tsp dry basil
4T Fresh Basil, chopped fine
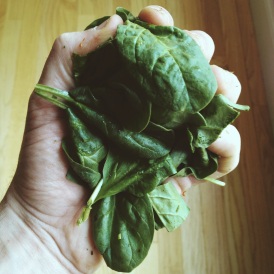
2 Good handfuls of fresh spinach, well chopped
2 tsp minced garlic + 2tsp minced garlic
4 Pieces of Sun-dried Tomato, NOT in oil, well chopped
2oz (about two thumb size pieces) asiago cheese, grated on large grate side

(okay…here we go) Preheat Oven to 350 degrees with rack in middle of oven.
I usually start at the fatter end of the chicken breast of the of breast and carefully make a cut from one end of the breast to the other forming a pocket. Take your time and make sure not to pierce the other side of the breast. When finished with chicken breasts, place on a lightly oiled cookie sheet, open a bottle of wine, beer or beverage of choice and celebrate…but not too long, more cookin’ to do!

In a mixing bowl combine fresh basil, spinach, 2tsp garlic, sundried tomato and asiago cheese. fold together with a spatula. sprinkle with a pinch of salt. lightly toss again.

Gently open one of the pockets on a chicken breast and start by stuffing 2 tablespoons of mixture into each breast. If you have some left over and chicken has more room feel free to stuff a little more. You may have more stuffing leftover at the end. *Note: DO not over stuff or stuffing won’t cook through and you will have cold(ish) chicken juice stuffing in the middle…ew

Combine dry seasonings into a small bowl. Lightly spray the tops of each chicken breast with oil (or brush on EV olive oil). sprinkle salt, dry herbs and pepper on top of each breast. Distribute about 1/2 teaspoon of remaining minced garlic on top of each breast.  feel free to finley shred a little more asiago cheese on top or leave it be…whatever. Place in a 350 degree oven. Cooking time depends on thickness of chicken breast….check them at 15 minutes then every 5 minutes after until chicken juices are clear and internal temp is 155/160 degrees.

Serve with what ever you and your family like. Tomato-Mozza Salad, pasta (tossed with a seperate batch of the filling), or wine (a side in my house). Enjoy your success and learn from your failures…laugh at both when you can!


On the Menu… 08/17/2014

Need to clear something up. More often then not you will see carry over of meals from a previous menu onto the new menu for the week. My wife and I are professionals and our 3 boys (two of them under 3 years old) require the occasional audible dinner during the week. For example, this past week my wife had two work items that went later than expected, I had unexpected errands to run after work with two boys and one of our babysitters quit unexpectedly just 8 days into the school year (Ahhhhh!). Thus followed one night of ordering pizza and a night of left overs. So, I will carry over the meals into the next week. Keeping meals that did not make the table and placing them on the next/new menu is our life. To try and post menu items that have not or will not make the table is misleading to all of you who peak at the chalkboard on a weekly basis. Have a wonderful week. New recipes popping up today. Please email/post/comment or reach out on instagram @foodishope to request a recipe! Enjoy!

On the Menu... 08-17-2014

On the Menu… 08-17-2014

Soy-Ginger Steak

Soy-Ginger Steak

Soy-Ginger Steak

Around the same time I was having success with my Chicken and Wild Rice Soup, I created my first “What do we have in the fridge?” recipe.  We had a chuck steak that had been in the freezer, some soy sauce, a knob of ginger, some rice vinegar and a jar of garlic-ginger paste I used for an Indian dish attempted the week prior. I marinated the steak in the recipe below for about 24 hours then through it on the grill. A good sear on both sides and then I cooked it indirect until medium rare. Not knowing much about different cuts of meat at the time, it was a bit chewy. Chuck roasts are now reserved for pot roast and slow cooker recipe cooking. Today we love this recipe on a few different cuts. The most common one I use is flank steak. It absorbs the marinade quickly, needing only 4 hours if in a time pinch (I usually do an overnight at least). This would be awesome with skirt steak, strip steak, tri-tip or sirloins as well. Pick one, marinate, grill, devour! Serve with a side of Avocado Sushi Rice** Recipe Follows!


1 flank Steak

Marinade:
1/2C Low Sodium Soy Sauce (if regular use 3T)
1/4C Rice Vinegar, unseasoned
2T Fresh Ginger, grated or fine chopped
1T Garlic, minced
1 tsp Sambal Olek (can substitute Siracha)
2 tsp toasted sesame oil

Mix all together in a 1 gallon zip-lock bag. Add meat. Place in a safe area of the fridge and let sit for at least 4 hours up to 8 hours. Place on a very hot grill. Depending on thickness, cook an average of 4 minutes on each side. Wrap tightly in foil and let rest 10 minutes. Slice about 1/2 inch thick and serve immediately.


Avocado Sushi Rice

Avocado Sushi Rice


Sushi-Rice: Alton Brown Recipe
1C Basmati Rice
2C Water
2T Rice Vinegar
2T Sugar
1T Salt
———————-
1 Avocado, cubed

Combine Water and rice over medium heat. When it boils, cover and reduce heat to simmer. remove when just tender and not mushy. Combine vinegar, sugar, salt in a bowl and stir until dissolved. Stir vinegar mixture into rice.

We go all fancy and rub sesame oil into a small glass prep bowl or ramekin then layer about an inch of rice. Next is a layer of avocado and then one more layer of sushi rice. The bowl is turned over quickly onto the plate and it creates this beautiful  layered side of Avocado Sushi Rice.


On the Menu 8/8/2014

Well school is back in full swing, therefore I am back to work! Meal time gets hectic but I do my best to cook every night that I can. Here is the Menu for the next week (or so) depending on what left-over nights, dine-out nights, and family gatherings we have coming up in the near future. Remember, not all of these recipes are going to make it to the site so please feel free and request a specific meal. I will make sure it is posted. I have had 2 requested from the previous menu that will be up soon. Take Care! – Food is Hope. Share your Food.

On the Menu 2

Chicken and Wild Rice Soup

Chicekn WIld RIce Soup Banner

I struggled a great deal to figure out which recipe will be my first post, so I called my wife, and without hesitation she said, “You need to start with your Chicken and Wild Rice Soup Recipe.” She (as usual) was right. This recipe encompasses everything about my culinary journey. The recipe that shot into my mind on that desperate night at the grocery store was a butterflied roasted chicken recipe I saw on Good Eats. Butterflying a chicken is an easy, small butchering project that was a gateway to bigger butchering and knife wielding meals. Spatchcoking (butterflying) is a wonderful learning experience and confidence builder in the kitchen. Next, I realized I had a knack for making good, flavorful soups. This particular soup recipe became the first, made from scratch, “original” recipe I came up with about 5 years ago.

There is a beautiful texture of juicy chicken, earthy rice and a creamy base! It’s super healthy too! The base is chicken broth, blended veggies and fresh herbs. The chicken is roasted, rendered of its fat, skinned and packed with rosemary! This recipe appears very involved the first time you put it together. After that though, you will be able to whip up this meal for any day of the week. I’m going to be quiet now and lets start the recipe. Please let me know if something doesn’t make sense or you have questions.

A quick note:
When I met my wife 7 years ago, I wasn’t a big vegetable eater. Mostly because I was raised on the canned stuff, and the fresh items my Mom did serve I was too finicky an eater to even try. So when I wanted carrots, onions, and celery in this soup, I needed a method of cooking with veggies without eating them directly. While making my first batch of this soup I busted out the blender. I placed everything (no rice or chicken…come on) in the blender and ended up with this silky smooth soup base. Little did I know that this method would be how I start to eat vegetables and make just about every “cream” soup in my repertoire. Gets my kids eating veggies too (sneaky, sneaky).

1 (4-5lb) whole chicken
1 large yellow onion, rough chop
3 carrots, rough chop
3 celery ribs, rough chop
1  small fennel bulb or half of a large, green stems removed (if any), bulb rough chopped
1 poultry bouquet (1 Bay Leaf, 3 Sprigs thyme, 2 Sprigs rosemary, 3 sage leaves)
3C chicken stock + additional 1C (if needed)
2T finely chopped rosemary mixed with 2 T kosher salt
Olive oil
1C (Dry) Trader Joe’s Brown Rice Medley
OR 1/2C wild rice, 1/2C white rice (basmati is good)

To butterfly and prep the chicken:
Place chicken on a cutting board. Make sure you take any bag or innards out of chicken cavity.
Place backbone up and with kitchen scissors (easiest) or a sharp knife cut down right side of ribs close to the spine. Repeat, this time cutting down the left side of ribs.
Gently open the chicken and locate the keil bone. It is the white, flat looking bone that runs down the middle of the chicken, opposite the backbone (looking straight down you should be staring at it. Place your knife on the keil bone and press down. When you hear it or feel it snap, the chicken should open all the way like a book. If you continue to press down you will split the chicken in two. Not a big deal if it happens, just a tad more work. Turn chicken over skin side up and flatten. It should lay flat and be in a butterfly shape. Yeah! Good job! (Time for a self high five!)

Now I’ll tell you….If you just want to buy a chicken already cut up you can but you’ll pay an average $3-$5. Learning this technique is a great starter place for learning to butcher poultry, building knife skills, and overall gaining more confidence in the kitchen. Turn on some good music, open a bottle of something and have fun…moving on.

Turn on your broiler and set rack to where chicken will be 6-8 inches or so from the heat source, just not any closer than 6 inches.
Gently poke your finger under the chicken skin.
Take rosemary salt and rub all over the chicken between meat and skin. Get under breast, thighs and legs. If and mix remains rub on meaty underside of chicken.
Drizzle olive oil over top of chicken skin and rub to coat evenly.
Take a little more salt and lightly dust top of skin, this will help it crisp up.
Place under heat, skin side down for 7 minutes.
Carefully turn chicken over to skin side up and place back under heat for another 7 minutes.
Switch oven to Bake, reduce heat to 350 and continue cooking chicken until done. About 15-20 minutes.
Skin should be golden, crispy and a thermometer should read 155-160 when inserted into deepest part of thigh.
Remove from oven. NOW STOP!!!!!!
Congrats you jut made a very delicious herb roasted chicken that you could serve as is, plate with a beautiful simple salad and serve with lemon. (Another self high five!) But we’re not doing that today…

Remove skin….I eat it….because crispy chicken skin is one of the greatest treats on the planet. Let chicken cool while you cook remaining soup.

Rice:
Cook according to directions on package. Set aside

To Complete Soup:
Over medium heat add 1.5 tablespoons of olive oil to your soup pot. Add all veggies and herbs to pot along with a pinch of salt. Stir for the first minute, cover and let sweat for 4 minutes. Give it a stir and repeat until onions begin to go translucent. Once that happens add chicken stock until veggies are covered by about 1 inch. Cover and let simmer until you can easily smash a carrot with the back of a fork. Transfer mix to a blender and blend until silky smooth. If mixture is thick while blending then add extra stock to achieve consistency. Place back in soup pot with heat off.

Tear all the meat off of the chicken and add it to the soup pot.
Now add the rice and gently stir it all together.
If needed, add more chicken stock until the consistency of a thick creamy soup. Taste and adjust salt and pepper if needed. I finish the soup by stirring in 2T of well chopped parsley into the pot.

Enjoy!

Ready for Serving!

Ready for Serving!

This is a warm hug in a bowl that your friends and family will love! This is a hearty main course but I have served this in mugs (seen below) for a first course as well.

Chicken & Wild Rice Soup